
Contour Cutting: An Introduction
Contour Cutting, or the art of drawing the outlines of images by tracing around their outer edges and then cutting them out with clean cuts, has traditionally been performed using a pair of scissors, an X-acto knife, or a small hand-held saw. (This is in the case of pre-printed images.) However, as we will soon show you, contour cut path outlines can be added digitally in programs like Flexi Design. Indeed, thanks to technology such as Flexi Design, very few people in the sign industry cut images by hand anymore.
Contour Cutting: Uses
First, before we dive into the wonderful world of contour cutting, particularly when it comes to adding contour cut path outlines in Flexi Design, let’s first discuss the various uses of contour cutting. At least commercially, contour cutting often involves cutting vinyl. This technique is used to create decals, signs, advertising boards, fashion designs, stickers, wood working…the list goes on! In fact, there is really no limit to the uses of contour cutting – especially within Flexi Design. If you can dream it, you can undoubtedly make it! (With a lot of practice and guidance!)
Contour Cutting: How Does it Work?
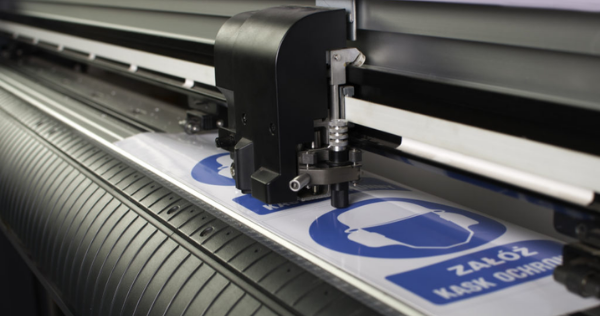
When it comes to modern day contour cutting, most vinyl cutters available on the market have laser/optical sensors. These specialized sensors are able to detect darkness and light. Once the vinyl cutters have collected this precise data, they combine it with the data sent to them via contour cutter software like Flexi Design. These two complimentary data sets then allow these vinyl cutters to plot the cut path outlining exactly where the image should be cut.
Contour Cutting: The Challenges
The challenges involved with contour cutting today include jobs cutting along incorrect cut path outlining, or other simple operator errors. Often, incorrect data points can get fed into the software. Indeed, even though SAi Flei Design is a user-friendly system, it is still quite possible for a novice operator – or perhaps a more than novice operator failing to pay attention – to make mistakes during the duration of the computer-aided design stage. Additionally, the vinyl cutter or computer could make errors – which are sometimes known as “mark scan errors.” These mark scan errors occur when the cutter’s sensor is unable to detect the proper registration marks and fails to cut along an accurate cut path. Despite these and other, similar, errors, however, if the vinyl cutter is calibrated correctly, the machine should be expected to perform to a 1/16” accuracy. Not 100% accurate, of course – but still, pretty damn close!
Flexi Design: Using the Contour Cut Effect
Now, let’s get down to the nitty gritty: adding a contour cut path outline within Flexi Design itself. First, create a Contor Cut around an object. The Contour Cut Effect within Flexi Design can be used to create one or more cutting lines around objects – either vector or bitmap. However, when cutting around bitmap images it is important to allow the Contour Cut Effect to trace the outline of objects in a bitmap, which will make the background of the image transparent using the Make Transparent function. Otherwise, the effect will only trace around the outside of the bitmap. Now that’s out of the way: select the desired objects you wish to cut around. Next, from the Effects menu, select Contour Cut. This will make the Contour Cut tab appear in DesignCentral. Within DesignCentral, adjust the parameters, or drag the Control Point on the Contour Cut line. Click Apply. If you wish to create multiple Contour Cuts around objects, simply repeat these steps.
Flexi Design: Adjusting a Contour Cut
In order to adjust a Contour Cut within Flexi Design, you can use the Contour select to change the type of Contour Shape. The options are Contour mode, Rectangle mode, or Ellipse mode. Additionally, you can select the Stroke (line) Style of your Contour Cut as well. To create a custom cut line, choose Edit from the dropdown menu. You can also adjust reference location, offset distance, offset point, alignment, proportional, with holes, color, joint type, etc., etc…
Flexi Design: Transforming Objects into a Cutting Line
Once you are using Flexi Design, and you are in need of a cutting line with a special shape, you can create a vector object – and transform this into a cutting line. Once converted into a cutting line, an object’s outline color will change to a light gray, indicating to the user it has been converted to a cutting line, and its fill color will change to Transparent. Even followingconversion to a cutting line, the object will retain its original attributes. Next, the user should select the desired object. From the Arrange menu, you can then point to Contour Cut and select Make Contour Cut.
Contour Cutting with Flexi Design
We hope this brief explainer on the wonderful world of modern day contour cutting and subsequent how to explaining its use and applications within digital software such as SAi Flexi Design were helpful for you. This cutting technique can, of course, be tricky, but if the user knows what they are doing and is equipped with measured guidance, they’ll soon be able to achieve the contour cut mastery of their dreams!
Schedule with an Adendo Advisor today!
If you seek further guidance when it comes to adding contour cut path outlines in Flexi Design, or are interested in exploring more in depth tutorials & walkthroughs when it comes to Flexi Software in general, let us help you! Just schedule a 1-on-1 conference with an Adendo advisor today – and you’ll receive expert guidance on creating anything within Flexi Software, which will meet – and exceed – your wildest expectations.